- The first step is to create an image to use for the menu. This image can be made in Photoshop

- Open flash and import the menu_img button. (File > Import > Import to library) and select the image.

- In the library you will find the image you just imported. Drag the image to the stage. On the TIMELINE, rename the layer for the button you're going to create (for instance, if you're going to make this a home page buttons, rename the layer "home"). Repeat until you have all the buttons you want on the stage and on their own layer.

- Once you have the buttons named and ready, its time to convert them to movie clips. Select the first image and convert it into a movie clip (Modify > Convert to symbol > Movie clip) and name each movie clip.

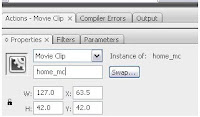
- Once you have converted the images to movie clips, we must give each clip and INSTANCE NAME. To do this, find the instance name box just below the stage to the left. Make sure you give each clip a different instance name (in this example, we named the home button "home_mc").
- Once all your buttons have been given distinct instance names, its time to get busy creating the fun stuff. Double clicking the "home" button will let you work inside the home movie clip. Once inside the movie clip, the button image will be on layer 1. Rename this layer "image" and create 3 new layers above the "image" layer. Starting with the top layer, rename them "actions", "over", and "text".

- First we will add the moving white box. Working on the "over" layer, use the Rectangle tool to create a white box with the same dimensions as the button image. Move the box up so that it is off the stage and immediately above the menu image. Now select the image and convert this box to a GRAPHIC and rename it "white_over_gf". With the white box graphic selected, change the opacity of it by going down to the COLOR drop down and select ALPHA and change the alpha % to 35%.


- Next we will add the text to the button. On the TEXT layer, type in whatever you wish for your button. Then convert this newly created text to a MOVIE CLIP.

- Next we need to add KEYFRAMES to our button timeline. To place a keyframe, select the frame you wish to place it and either INSERT > TIMELINE > KEYFRAME. Add keyframes to the frame 1 and 7 on the ACTIONS, OVER, and TEXT layers and on the 12th frame of the TEXT and OVER layers. Next, add a regular frame on the 12th frame of the IMAGE and ACTIONS layer. (to add a regular frame, highlight the frame you wish and Insert > Timeline > Frame).

- Now we are going to add some STOP actions to the 1st and 7th frame of the ACTIONS layer. On the 1st keyframe in the ACTIONS layer, open the actions window (Windows > Actions). Once open, type "stop();" Repeat this action for both frames. Once you have finished, there will be a small "a" in both keyframes.

- Now we are going to add some motion to the over box. Select the keyframe on frame 7 of the OVER layer. Using the cursor, move the white box down so that it matches up perfect over the menu image. Next, select the keyframe on frame 12 of the OVER layer, and cursor that white box so that it is directly below the menu image. Select the space between frame 1 and 7 on the OVER layer. In the properties panel bottom, select MOTION from the drop down box next to TWEEN. An arrow should appear in the timeline between the keyframes. Repeat this for the space between keyframes 7 and 12 on the OVER layer.

- Almost done! Now go back to the main timeline by clicking the "Scene 1" icon. Create a new layer above all the buttons and name this layer "overs". On this new layer, use the RECTANGLE tool to create a rectangle that matches the dimensions of the menu_img.jpg graphic. Convert this new rectangle to a BUTTON.

- Set the ALPHA of the button to 0% so that it is transparent. Repeat this until all the movie clips have buttons over them.

- Now, with the transparent button selected, open the Actions window and add the following actionscript to the button:

- That's it! Enjoy!
Thursday, December 13, 2007
[Flash] Animated Roll On/Off Menu


Subscribe to:
Post Comments (Atom)
No comments:
Post a Comment